HotSpot Gateway
| Document revision: | 4.2 (Tue Jul 04 14:49:38 GMT 2006) |
| Applies to: | V2.9 |
General Information
Summary
The MikroTik HotSpot Gateway enables providing of public network access for clients using wireless or wired network connections.
HotSpot Gateway features:
- authentication of clients using local client database, or RADIUS server
- accounting using local database, or RADIUS server
- Walled-garden system (accessing some web pages without authorization)
Quick Setup Guide
The most noticeable difference in user experience setting up HotSpot system in version 2.9 from the previous RouterOS versions is that it has become in order of magnitude easier to set up a correctly working HotSpot system.
Given a router with two interfaces: Local (where HotSpot clients are connected to) and Public, which is connected to the Internet. To set up HotSpot on the Local interface:
- first, a valid IP config is required on both interfaces. This can be done with /setup command. In this example we will assume the configuration with DHCP server on the Local interface
- valid DNS configuration must be set up in the /ip dns submenu
- To put HotSpot on the Local interface, using the same IP address pool as DHCP server uses for that interface:
/ip hotspot add interface=local address-pool=dhcp-pool-1 - and finally, add at least one HotSpot user:
/ip hotspot user add name=admin
These simple steps should be sufficient to enable HotSpot system
Please find many HotSpot How-to's, which will answer most of your questions about configuring a HotSpot gateway, at the end of this manual. It is still recommended that you read and understand all the Description section below before deploying a HotSpot system.
If this does not work:
- check that /ip dns contains valid DNS servers, try to /ping www.mikrotik.com to see, that DNS resolving works
- make sure that connection tracking is enabled:
/ip firewall connection tracking set enabled=yes
Specifications
Packages required: hotspot, dhcp(optional)License required: Level1 (Limited to 1 active user) , Level3 (Limited to 1 active user) , Level4 (Limited to 200 active users) , Level5 (Limited to 500 active users) , Level6
Submenu level: /ip hotspot
Standards and Technologies: ICMP, DHCP
Hardware usage: Not significant
Description
MikroTik HotSpot Gateway should have at least two network interfaces:
- HotSpot interface, which is used to connect HotSpot clients
- LAN/WAN interface, which is used to access network resources. For example, DNS and RADIUS server(s) should be accessible
The diagram below shows a sample HotSpot setup.
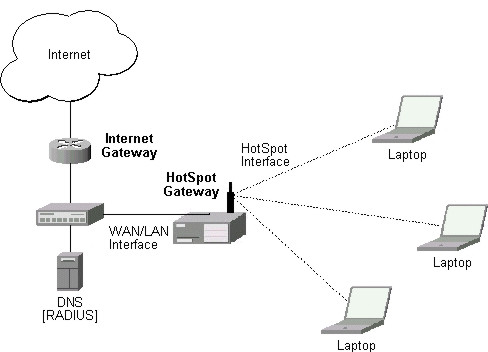
The HotSpot interface should have an IP address assigned to it. Physical network connection has to be established between the HotSpot user's computer and the gateway. It can be wireless (the wireless card should be registered to AP), or wired (the NIC card should be connected to a hub or a switch).
Note that the most noticeable difference in user experience setting up HotSpot system in version 2.9 from the previous RouterOS versions is that it has become in order of magnitude easier to set up a correctly working HotSpot system.
Introduction to HotSpotHotSpot is a way to authorize users to access some network resources. It does not provide traffic encryption. To log in, users may use almost any web browser (either HTTP or HTTPS protocol), so they are not required to install additional software. The gateway is accounting the uptime and amount of traffic each of its clients have used, and also can send this information to a RADIUS server. The HotSpot system may limit each particular user's bitrate, total amount of traffic, uptime and some other parameters mentioned further in this document.
The HotSpot system is targeted to provide authentication within a local network (to access the Internet), but may as well be used to authorize access from outer networks to access local resources. Configuring Walled Garden feature, it is possible to allow users to access some web pages without the need of prior authentication.
Getting AddressFirst of all, a client must get an IP address. It may be set on the client statically, or leased from a DHCP server. The DHCP server may provide ways of binding lent IP addresses to clients MAC addresses, if required. The HotSpot system does not care how did a client get an address before he/she gets to the HotSpot login page.
Moreover, HotSpot server may automatically and transparently change any IP address (yes, meaning really any IP address) of a client to a valid unused address from the selected IP pool. This feature gives a possibility to provide a network access (for example, Internet access) to mobile clients that are not willing (or are disallowed, not qualified enough or otherwise unable) to change their networking settings. The users will not notice the translation (i.e., there will not be any changes in the users' config), but the router itself will see completely different (from what is actually set on each client) source IP addresses on packets sent from the clients (even firewall mangle table will 'see' the translated addresses). This technique is called one-to-one NAT, but is also known as "Universal Client" as that is how it was called in the RouterOS version 2.8.
One-to-one NAT accepts any incoming address from a connected network interface and performs a network address translation so that data may be routed through standard IP networks. Clients may use any preconfigured addresses. If the one-to-one NAT feature is set to translate a client's address to a public IP address, then the client may even run a server or any other service that requires a public IP address. This NAT is changing source address of each packet just after it is received by the router (it is like source NAT that is performed earlier, so that even firewall mangle table, which normally 'sees' received packets unaltered, can only 'see' the translated address).
Note also that arp mode must be enabled on the interface you use one-to-one NAT on.
Before the authenticationWhen enabling HotSpot on an interface, the system automatically sets up everything needed to show login page for all clients that are not logged in. This is done by adding dynamic destination NAT rules, which you can observe on a working HotSpot system. These rules are needed to redirect all HTTP and HTTPS requests from unauthorized users to the HotSpot servlet (i.e., the authentication procedure, e.g., the login page). Other rules that are also inserted, we will describe later in a special section of this manual.
In most common setup, opening any HTTP page will bring up the HotSpot servlet login page (which can be customized extensively, as will be described later on). As normal user behavior is to open web pages by their DNS names, a valid DNS configuration should be set up on the HotSpot gateway itself (it is possible to reconfigure the gateway so that it will not require local DNS configuration, but such a configuration is impractical and thus not recommended).
Walled GardenYou may wish not to require authorization for some services (for example to let clients access the web server of your company without registration), or even to require authorization only to a number of services (for example, for users to be allowed to access an internal file server or another restricted area). This can be done by setting up Walled Garden system.
When a not logged-in user requests a service allowed in the Walled Garden configuration, the HotSpot gateway does not intercept it, or in case of HTTP, simply redirects the request to the original destination (or to a specified parent proxy). When a user is logged in, there is no effect of this table on him/her.
To implement the Walled Garden feature for HTTP requests, an embedded web proxy server has been designed, so all the requests from not authorized users are really going through this proxy. Note that the embedded proxy server does not have caching function yet. Also note that this embedded proxy server is in the system software package and does not require web-proxy package. It is configurable under /ip proxy
AuthenticationThere are currently 5 different authentication methods. You can use one or more of them simultaneously:
- HTTP PAP - simplest method, which shows the HotSpot login page and expect to get the authentication info (i.e. username and password) in plain text. Note that passwords are not being encrypted when transferred over the network. An another use of this method is the possibility of hard-coded authentication information in the servlet's login page simply creating the appropriate link.
- HTTP CHAP - standard method, which includes CHAP challenge in the login page. The CHAP MD5 hash challenge is to be used together with the user's password for computing the string which will be sent to the HotSpot gateway. The hash result (as a password) together with username is sent over network to HotSpot service (so, password is never sent in plain text over IP network). On the client side, MD5 algorithm is implemented in JavaScript applet, so if a browser does not support JavaScript (like, for example, Internet Explorer 2.0 or some PDA browsers), it will not be able to authenticate users. It is possible to allow unencrypted passwords to be accepted by turning on HTTP PAP authentication method, but it is not recommended (because of security considerations) to use that feature.
- HTTPS - the same as HTTP PAP, but using SSL protocol for encrypting transmissions. HotSpot user just send his/her password without additional hashing (note that there is no need to worry about plain-text password exposure over the network, as the transmission itself is encrypted). In either case, HTTP POST method (if not possible, then - HTTP GET method) is used to send data to the HotSpot gateway.
- HTTP cookie - after each successful login, a cookie is sent to web browser and the same cookie is added to active HTTP cookie list. Next time the same user will try to log in, web browser will send http cookie. This cookie will be compared with the one stored on the HotSpot gateway and only if source MAC address and randomly generated ID match the ones stored on the gateway, user will be automatically logged in using the login information (username and password pair) was used when the cookie was first generated. Otherwise, the user will be prompted to log in, and in the case authentication is successful, old cookie will be removed from the local HotSpot active cookie list and the new one with different random ID and expiration time will be added to the list and sent to the web browser. It is also possible to erase cookie on user manual logoff (not in the default server pages). This method may only be used together with HTTP PAP, HTTP CHAP or HTTPS methods as there would be nothing to generate cookies in the first place otherwise.
- MAC address - try to authenticate clients as soon as they appear in the hosts list (i.e., as soon as they have sent any packet to the HotSpot server), using client's MAC address as username
HotSpot can authenticate users consulting the local user database or a RADIUS server (local database is consulted first, then - a RADIUS server). In case of HTTP cookie authentication via RADIUS server, the router will send the same information to the server as was used when the cookie was first generated. If authentication is done locally, profile corresponding to that user is used, otherwise (in case RADIUS reply did not contain the group for that user) the default profile is used to set default values for parameters, which are not set in RADIUS access-accept message. For more information on how the interaction with a RADIUS server works, see the respective manual section.
The HTTP PAP method also makes it possible to authenticate by requesting the page /login?username=username&password=password . In case you want to log in using telnet connection, the exact HTTP request would look like that: GET /login?username=username&password=password HTTP/1.0 (note that the request is case-sensitive)
After authentication, user gets access to the Internet, and receives some limitations (which are user profile specific). HotSpot may also perform a one-to-one NAT for the client, so that a particular user would always receive the same IP address regardless of what PC is he/she working at.
The system will automatically detect and redirect requests to a proxy server a client is using (if any; it may be set in his/her settings to use an unknown to us proxy server) to the proxy server embedded in the router.
Authorization may be delegated to a RADIUS server, which delivers similar configuration options as the local database. For any user requiring authorization, a RADIUS server gets queried first, and if no reply received, the local database is examined. RADIUS server may send a Change of Authorization request according to standards to alter the previously accepted parameters.
AdvertisementThe same proxy used for unauthorized clients to provide Walled-Garden facility, may also be used for authorized users to show them advertisement popups. Transparent proxy for authorized users allows to monitor http requests of the clients and to take some action if required. It enables the possibility to open status page even if client is logged in by mac address, as well as to show advertisements time after time
When time has come to show an advertisement, the server redirects client's web browser to the status page. Only requests, which provide html content, are redirected (images and other content will not be affected). The status page displays the advertisement and next advertise-interval is used to schedule next advertisement. If status page is unable to display an advertisement for configured timeout starting from moment, when it is scheduled to be shown, client access is blocked within walled-garden (as unauthorized clients are). Client is unblocked when the scheduled page is finally shown. Note that if popup windows are blocked in the browser, the link on the status page may be used to open the advertisement manually.
While client is blocked, FTP and other services will not be allowed. Thus requiring client to open an advertisement for any Internet activity not especially allowed by the Walled-Garden.
AccountingThe HotSpot system implement accounting internally, you are not required to do anything special for it to work. The accounting information for each user may be sent to a RADIUS server.
Configuration menus- /ip hotspot - HotSpot servers on particular interfaces (one server per interface). HotSpot server must be added in this menu in order for HotSpot system to work on an interface
- /ip hotspot profile - HotSpot server profiles. Settings, which affect login procedure for HotSpot clients are configured here. More than one HotSpot servers may use the same profile
- /ip hotspot host - dynamic list of active network hosts on all HotSpot interfaces. Here you can also find IP address bindings of the one-to-one NAT
- /ip hotspot ip-binding - rules for binding IP addresses to hosts on hotspot interfaces
- /ip hotspot service-port - address translation helpers for the one-to-one NAT
- /ip hotspot walled-garden - Walled Garden rules at HTTP level (DNS names, HTTP request substrings)
- /ip hotspot walled-garden ip - Walled Garden rules at IP level (IP addresses, IP protocols)
- /ip hotspot user - local HotSpot system users
- /ip hotspot user profile - local HotSpot system users profiles (user groups)
- /ip hotspot active - dynamic list of all authenticated HotSpot users
- /ip hotspot cookie - dynamic list of all valid HTTP cookies
Question&Answer-Based Setup
Command name: /ip hotspot setupQuestions
address pool of network (name) - IP address pool for the HotSpot networkdns name (text) - DNS domain name of the HotSpot gateway (will be statically configured on the local DNS proxydns servers (IP address,[IP address]) - DNS servers for HotSpot clientshotspot interface (name) - interface to run HotSpot onip address of smtp server (IP address; default: 0.0.0.0) - IP address of the SMTP server to redirect SMTP requests (TCP port 25) toNotes
Depending on current settings and answers to the previous questions, default values of following questions may be different. Some questions may disappear if they become redundant
Example
To configure HotSpot on ether1 interface (which is already configured with address of 192.0.2.1/25), and adding user admin with password rubbish:
[admin@MikroTik] > ip hotspot setup
hotspot interface: ether1
local address of network: 192.0.2.1/24
masquerade network: yes
address pool of network: 192.0.2.2-192.0.2.126
select certificate: none
ip address of smtp server: 0.0.0.0
dns servers: 192.0.2.254
dns name: hs.example.net
name of local hotspot user: admin
password for the user: rubbish
[admin@MikroTik] >

Tidak ada komentar:
Posting Komentar